A Useful Toddler Craft Project!
The links in this post may be affiliate links. That means that if you click them and make a purchase, this site makes a commission. It will have no impact on the price you pay or the experience of your purchase.
I know, you thought it only existed in the land of comfortable stilettos and that machine Jane Jetson used to make dinner, right?
So I had this idea last fall, and decided to (have Max) make them for a bunch of family members… I didn't post before Christmas because the recipients read my blog, so here we are in January. (Just in time to make President's Day gifts!) We made two versions of this craft; a t-shirt and a reuseable shopping/tote bag (because who doesn't need more of those?)
I took step-by-step photos for the t-shirt; I'll get more into the tote bag at the end of this post.
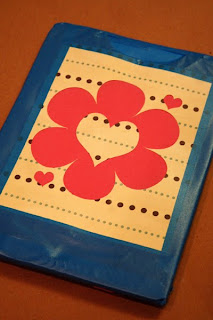
First, I used Illustrator to create a design and my SilhouetteSD to cut out a stencil. In this case, I asked my 4 year old niece what her favorite shape was, and she said “Princess!” I told her princess isn't a shape, so she said she was stuck between hearts and flowers. Works for me! I set the shape up to cut out as big as I could do on the cutter; you could easily use Cricut shapes, or stick with simple freehanded ones too! (Just use blue tape; check in the tote bag notes at the end)
 I used an old piece of scrapbook paper to cut out my stencil; here's the stencil and the reversed (leftover) cut-out piece:
 I taped the t-shirt tightly to a piece of cardboard (I used a pizza box lid that I cut down) I then used Elmer's Craft Bond spray adhesive. By letting it dry on the stencil for a few minutes before sticking it to the shirt, it has a temporary kind of sticky, so it can be peeled off later.
 Once the stencil is stuck on, I used blue painter's tape to completely hide the shirt, to protect it from the upcoming 2 year old with a paintbrush!
 I took my turn painting first, using a foam brush to completely fill in the background of the image… this way, I didn't have to worry about Max's painting completely filling the shape and then losing the outline when the stencil came off. (And I wanted a chance to play too! LOL)
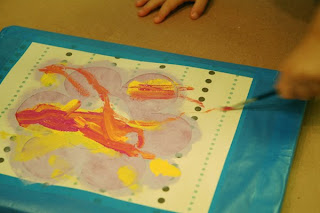
 Then a put Max in his t-shirt smock, squirted a little bit of each of three colors of fabric paint on a paper plate, and let him go to town!
 The finished painting, before pulling off the stencil. I let it dry like this for an hour or two before peeling it all off.
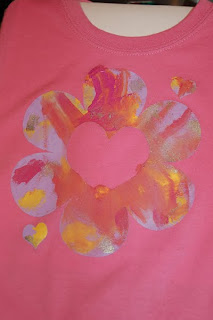
 And the finished painting! Notice that there are a couple of spots where the paint got outside of the stencil (the left edge of the top petal, and the base of the heart) I think it's one of the concerns with having a more complex shape; the details are places for the stencil to peel up.
 And the happy recipient kinda sorta modeling the finishing shirt! She *is* just a four year old, so this was the best I could get out of her! LOL
 Now, I realized that not everyone would want to sport a Maxwell original emblazoned across their chests, so I made this variation. With the trend towards using fabric bags for groceries and errand running, it always seems like you never have enough of them, so we made some for all of the grandmas (there are three) and two aunties.
First off, the bags. I bought them in a 3-pack at Joann's for about $10, and used my 40% off coupon… if I'd planned ahead better, I've seen them online for about $1 each, so that might be worth it if you've got time for shipping!
I didn't want to use white totes, because they just get dirty and grungy, so I dyed them in my kitchen sink, using good old RIT. I ended up with this lovely teal color that made for a great background for our available paint colors (2 shades of purple, metallic silver, yellow and hottish pink)
On the tote bags, I set the darker purple aside from Max's painting, using it for something else instead.
Because we had to do so many of these ones, I wanted to streamline the process a bit, so I just used the blue painter's tape to block off a large square/rectangle shape for the art. Like the t-shirt, I pre-painted the background to ensure that the edges would be defined when I pulled off the tape.
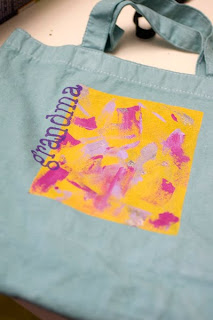
Tote bag (stretched over and taped to a pizza box lid again) taped to cover all exposed area that I didn't want painted, and my pre-painted background area: After Max had done his thing, and I'd let it dry for a few hours, I peeled off the tape and added the final touch, using the darkest purple paint I had, and my old foam stamps from my scrapbooking stash.
This one was for Grandma (of course) but we also did monograms for the aunties (with a larger stamp) My mom excitedly called me the week after receiving her bag; “I used Max's bag today and got a compliment at Trader Joe's!” she said. So that's it! Super easy, super afforable, super cute and, most importantly of all, super USEFUL! It's not another piece of paper/macaroni/styrofoam that needs to be dealt with, it's something everyone can use!
I'd love to see your versions, if you and your kids make some! Please let me know if you do!


Wow! Look at you little Ms. Krafty Pants! That's fantastic.
Awesome!! I've got to try that with my kids.
–Beth/Strawberry